まずは
WSL を有効に
つぎにUbuntu
BIOSの設定
- BIOS画面に入る。
- PCメーカー別
- 富士通 :
F2キー - NEC :
F2キー - 東芝 :
F2キーまたはESCキーを押しながら起動し、メーカーロゴが表示されたらF1キーを押下する - Lenovo(IBM) :
F1キー - HP(Compaq) :
F10キー - Dell :
F2キーまたはCtrl + Alt + Enter - 日立 :
F2キー - Panasonic :
F2キー - Sharp :
F2キー - ASUS :
F2キー - ソニー :
F2キー - 自作PCまたはパソコンショップで購入したPCなど :
Delete
- 富士通 :
- マザーボードメーカー別
- ASUS :
Delete - Intel :
F2キー - Giga-byte :
Delete - ESC :
Delete - ASROCK :
F2キー - MSI :
Delete
- ASUS :
- OS起動後からBIOSに入る
- スタートボタンを押下する
- 設定ボタンを押下する
- 更新とセキュリティを押下する
- 回復 > PCの起動をカスタマイズする > 今すぐPCを再起動する を押下する
- オプションの選択 > トラブルシューティング > 詳細オプション > UEFI ファームウェアの設定 を押下する
- PCメーカー別
Virtualization TechnologyをEnabledに変更する。
Windows の機能の有効化または無効化の設定
Windows の機能の有効化または無効化を開く。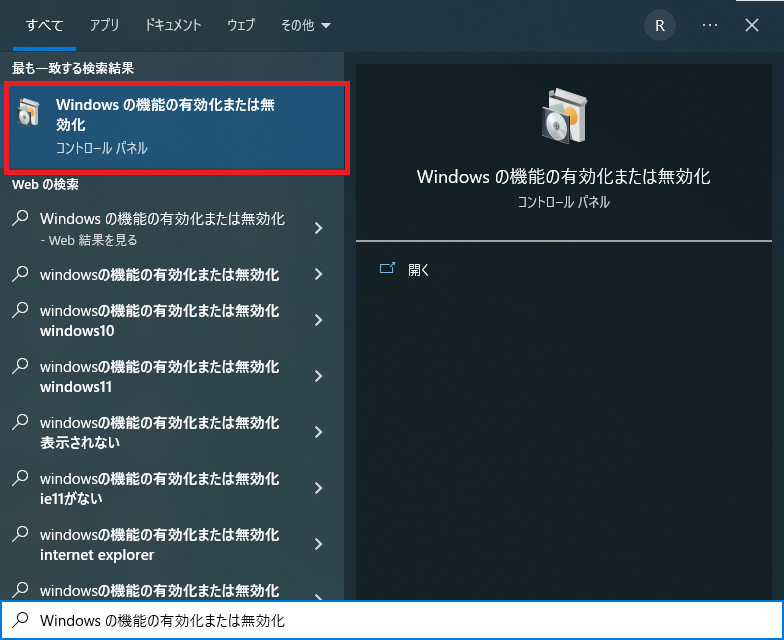
Hyper-V,Linux 用 Windows サブシステムまたはWindows Subsystem for Linux,仮想マシンプラットフォームを有効にする。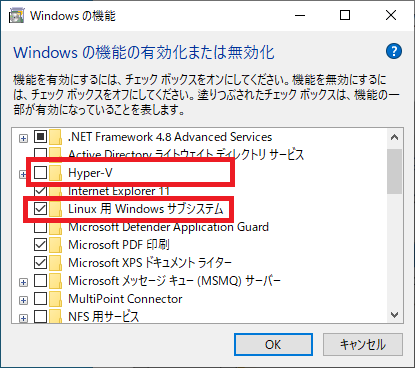
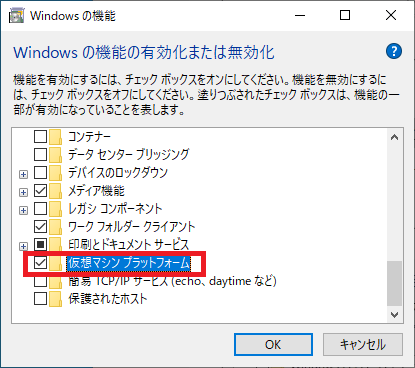
OKを押下する。- PCを再起動する。
以下コマンドでも設定ができる。
# 「Linux 用 Windows サブシステム」 または 「Windows Subsystem for Linux」 を有効
dism.exe /online /enable-feature /featurename:Microsoft-Windows-Subsystem-Linux /all /norestart

# 「仮想マシン プラットフォーム」 を有効
> dism.exe /online /enable-feature /featurename:VirtualMachinePlatform /all /norestart
> dism.exe /online /enable-feature /featurename:Microsoft-Windows-Subsystem-Linux /all /norestart

展開イメージのサービスと管理ツール
バージョン: 10.0.19041.844

イメージのバージョン: 10.0.19044.1826

機能を有効にしています
[==========================100.0%==========================]
操作は正常に完了しました。
> dism.exe /online /enable-feature /featurename:VirtualMachinePlatform /all /norestart

展開イメージのサービスと管理ツール
バージョン: 10.0.19041.844

イメージのバージョン: 10.0.19044.1826

機能を有効にしています
[==========================100.0%==========================]
操作は正常に完了しました。
wsl2インストール
1.WSLバージョンを2に設定する
wsl --set-default-version 2
> wsl --set-default-version 2
WSL 2 との主な違いについては、https://aka.ms/wsl2 を参照してください
この操作を正しく終了しました。
2.使用可能な Linux ディストリビューションを一覧表示する
wsl --list --online
> wsl --list --online
インストールできる有効なディストリビューションの一覧を次に示します。
'wsl --install -d <Distro>' を使用してインストールします。

NAME            FRIENDLY NAME
Ubuntu          Ubuntu
Debian          Debian GNU/Linux
kali-linux      Kali Linux Rolling
openSUSE-42     openSUSE Leap 42
SLES-12         SUSE Linux Enterprise Server v12
Ubuntu-16.04    Ubuntu 16.04 LTS
Ubuntu-18.04    Ubuntu 18.04 LTS
Ubuntu-20.04    Ubuntu 20.04 LTS
3.Linux ディストリビューションをインストール
wsl --install -d Ubuntu
> wsl --install -d Ubuntu
ダウンロード中: Ubuntu
インストール中: Ubuntu
Ubuntu はインストールされました。
Ubuntu を起動しています...
4.ubuntu を起動する。
- 初回起動時は ユーザ名 と パスワード を入力する。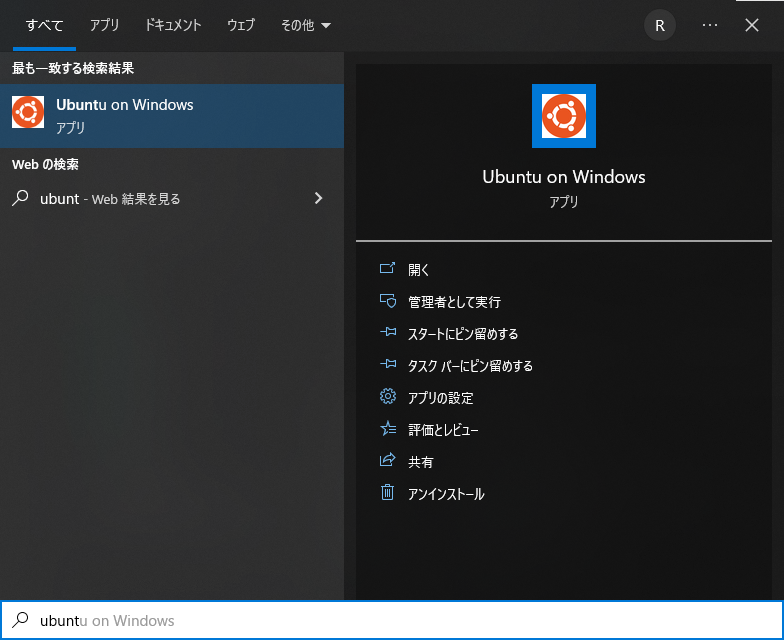
Installing, this may take a few minutes...
Please create a default UNIX user account. The username does not need to match your Windows username.
For more information visit: https://aka.ms/wslusers
Enter new UNIX username: 【ユーザ名】
New password:【パスワード】
Retype new password:【パスワード】
passwd: password updated successfully
Installation successful!
To run a command as administrator (user "root"), use "sudo <command>".
See "man sudo_root" for details.

Welcome to Ubuntu 20.04 LTS (GNU/Linux 5.10.102.1-microsoft-standard-WSL2 x86_64)

 * Documentation:  https://help.ubuntu.com
 * Management:     https://landscape.canonical.com
 * Support:        https://ubuntu.com/advantage

  System information as of Mon Jul 25 22:56:43 JST 2022

  System load:  0.19               Processes:             8
  Usage of /:   0.4% of 250.98GB   Users logged in:       0
  Memory usage: 0%                 IPv4 address for eth0: 172.20.70.116
  Swap usage:   0%

0 updates can be installed immediately.
0 of these updates are security updates.


The list of available updates is more than a week old.
To check for new updates run: sudo apt update


This message is shown once once a day. To disable it please create the
/home/【ユーザ名】/.hushlogin file.
【ユーザ名】@【PC名】:~$
5.実行結果のように起動できれば成功。
エラー時の対処
ubuntu起動時に以下のエラーが発生した場合
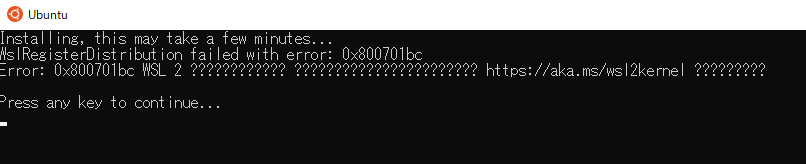
1.WSLを更新する。
wsl --update
2.WSLを再起動する。
wsl --shutdown参照
https://dsp-lab.net/2023/10/11/post-590/
radiocondaを用いてUbuntu 22.04でGNU Radioをインストール
GNU Radioを用いて開発や研究を行う方にとっては,2023年10月現在,radiocondaによるGNU Radioのインストールが最も便利だと思われる.https://github.com/ryanvolz/radioconda からLinux用(x86_64 (amd64)アーキテクチャ用)のインストーラをダウンロードして,以下のように実行する.検証に使用したパソコンは,Ubuntu 22.04.3 LTSを新規にインストールした状態である(GNU Radioのバイナリパッケージは,一切インストールしていない).
$ bash ./radioconda-2023.07.26-Linux-x86_64.sh
画面に膨大なインストールログが表示される.ログの末尾には,対象とするソフトウェア無線環境ごとに必要な設定も記載されている(GitHubにも,設定に関するほぼ同等の内容の記載はある).
radioconda は,GNU Radioを含む主要なオープンソースのソフトウェア無線パッケージ集である.Anaconda, Inc.謹製の conda package manager(およびconda互換のより高速なソフトウェア mamba)がバンドルされている.radiocondaを用いることで,各種のソフトウェア無線機に対応したGNU Radio環境を,Ubuntuユーザの(主として)ホームディレクトリ以下に容易に構築できる.1台のUbuntuマシンに複数バージョンのGNU Radio環境を共存させたい,という要求にも応えられそうだ.とりあえずradiocondaをインストールすれば,対応しているソフトウェア無線機の使用を開始できる,という状況となることを目指して提供されているようで,とてもありがたい.
GNU Radioをインストールする際には,上記のradiocondaのインストールで準備された base conda environment で直接行うのではなく,ユーザが命名するGNU Radio用の「環境」内で行うことが強く推奨されている.GNU Radio Wikiでの説明は以下の通り.
It’s almost never a good idea to install additional packages to your base conda environment because their dependencies may interfere with conda’s own dependencies. We recommend creating an environment specifically for GNU Radio and related packages. From a console with the base conda environment activated, run
$ conda create -n gnuradio
to create an empty environment called “gnuradio".
上記のやり方は,condaを用いて必要なライブラリを備えたPythonの開発環境を準備する際の考え方と同じなので,Pythonで開発をされる方や機械学習/深層学習界隈の方にとっては,おなじみかと思います.
Enter the environment by activating it with the command: というドキュメントの記載に従って以下のコマンドを実行し,先ほど作成した conda での「gnuradio 環境」をactivateする.ここでの「gnuradio」は,利用者が先ほど作成(命名)した環境の名称を表す単なる文字列である.
$ conda activate gnuradio
続いて,Before installing the GNU Radio packages, we need to ensure that the environment is set up to look for packages from conda-forge: というGNU Radio Wikiの記載に従って下記を実行する((gnuradio) sdr2023@dsp:~$までは単なるプロンプト).
(gnuradio) sdr2023@dsp:~$ conda config --env --add channels conda-forge
(gnuradio) sdr2023@dsp:~$ conda config --env --set channel_priority strict
GNU Radioをインストールする準備ができたので,以下によりインストールを実行する.下記のコマンドラインでの「gnuradio」は,主要なソフトウェア無線機向けのGNU Radioと関連ツール一式が含まれるradioconda(conda-forge)でのパッケージ名である.対象デバイス等は,GitHubに記載がある.
(gnuradio) sdr2023@dsp:~$ conda install gnuradio
以上でインストールは完了する.コマンドプロンプトの前にある(gnuradio)という文字列は,「gnuradio環境」でのコマンドプロンプトであることを示す単なる目印である.USRPを使いたいので,下記を実行しておく.
(gnuradio) sdr2023@dsp:~$ uhd_images_downloader
また,ADALM-PLUTO(IIO(Pluto SDR))も使いたいので,GitHubの記載に基づき下記を実行しておく.
(gnuradio) sdr2023@dsp:~$ sudo ln -s $CONDA_PREFIX/lib/udev/rules.d/90-libiio.rules /etc/udev/rules.d/90-radioconda-libiio.rules
(gnuradio) sdr2023@dsp:~$ sudo udevadm control --reload
(gnuradio) sdr2023@dsp:~$ sudo udevadm trigger
我々のところでは,以上のように作業を行ってきたUbuntuマシンのログインユーザは,専らGNU Radioを使用するためのユーザと想定している.ホームディレクトリの.bashrcの末尾に以下を書いておいた.mambaは,condaと書いても同じである.
mamba activate gnuradio
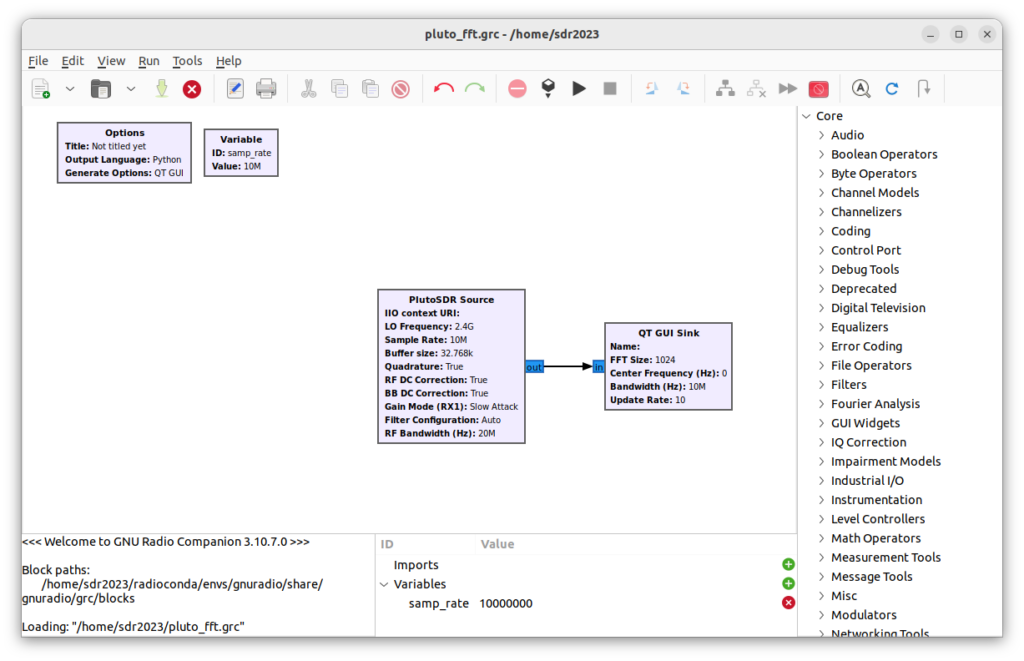
作業はこれで終わりで,以下のようにGNU Radio Companionを起動できる.2023年10月11日の状況では,GNU Radio 3.10.7.0がインストールされた.インストールされたUHDは,UHD 4.5.0.HEAD-releaseという最新版であった.
(gnuradio) sdr2023@dsp:~$ gnuradio-companion
(gnuradio) sdr2023@dsp:~$ uhd_config_info --print-all
UHD 4.5.0.HEAD-release
Build date: Wed, 04 Oct 2023 05:55:34
C compiler: GNU 12.3.0
C++ compiler: GNU 12.3.0
C flags: -DBOOST_ERROR_CODE_HEADER_ONLY -DBOOST_ASIO_DISABLE_STD_STRING_VIEW -DBOOST_ASIO_DISABLE_STD_EXPERIMENTAL_STRING_VIEW -DHAVE_CONFIG_H -DUHD_LOG_MIN_LEVEL=1 -DUHD_LOG_CONSOLE_LEVEL=2 -DUHD_LOG_FILE_LEVEL=2 -DUHD_LOG_CONSOLE_COLOR-march=nocona -mtune=haswell -ftree-vectorize -fPIC -fstack-protector-strong -fno-plt -O2 -ffunction-sections -pipe -isystem /home/sdr2023/radioconda/envs/gnuradio/include -fdebug-prefix-map=/home/conda/feedstock_root/build_artifacts/uhd_1696398762321/work=/usr/local/src/conda/uhd-4.5.0.0 -fdebug-prefix-map=/home/sdr2023/radioconda/envs/gnuradio=/usr/local/src/conda-prefix
C++ flags: -DBOOST_ERROR_CODE_HEADER_ONLY -DBOOST_ASIO_DISABLE_STD_STRING_VIEW -DBOOST_ASIO_DISABLE_STD_EXPERIMENTAL_STRING_VIEW -DHAVE_CONFIG_H -DUHD_LOG_MIN_LEVEL=1 -DUHD_LOG_CONSOLE_LEVEL=2 -DUHD_LOG_FILE_LEVEL=2 -DUHD_LOG_CONSOLE_COLOR-fvisibility-inlines-hidden -fmessage-length=0 -march=nocona -mtune=haswell -ftree-vectorize -fPIC -fstack-protector-strong -fno-plt -O2 -ffunction-sections -pipe -isystem /home/sdr2023/radioconda/envs/gnuradio/include -fdebug-prefix-map=/home/conda/feedstock_root/build_artifacts/uhd_1696398762321/work=/usr/local/src/conda/uhd-4.5.0.0 -fdebug-prefix-map=/home/sdr2023/radioconda/envs/gnuradio=/usr/local/src/conda-prefix -fvisibility=hidden -fvisibility-inlines-hidden
Enabled components: LibUHD, LibUHD - C API, LibUHD - Python API, Examples, Utils, USB, B100, B200, USRP1, USRP2, X300, MPMD, N300, N320, E320, X400, OctoClock
Install prefix: /home/conda/feedstock_root/build_artifacts/uhd_1696398762321/_h_env_placehold_placehold_placehold_placehold_placehold_placehold_placehold_placehold_placehold_placehold_placehold_placehold_placehold_placehold_placehold_placehold_placehold_placehold_placeho
Boost version: 1.82
Libusb version: 1.0.27
Library path: /home/sdr2023/radioconda/envs/gnuradio/lib
Package path: /home/sdr2023/radioconda/envs/gnuradio
Images directory: /home/sdr2023/radioconda/envs/gnuradio/share/uhd/images
ABI version string: 4.5.0
conda および mambaは,Python開発環境での複雑なライブラリ問題に対処している有用なツールで,広く使われている.これを活用して,GNU Radio環境(GNU Radioから使用できる主要なソフトウェア無線機に対応可能な状態)や関連のツールをインストールする手段を提供しているradiocondaは,とても役に立つ.GNU Radio界隈とって非常に有用な存在だと感じている.長くGNU Radioを使っていくと,バージョンの混在がどうしても発生してしまう(以前に作成したGRCブロックが,最新版では動かないなどの理由から).この種の問題にはPyBOMBSで対処してきたが,これからはradiocondaが役に立つのではないか.先の記事で示したUbuntu PPA Installationではなく,radioconda環境でインストールしたGNU Radioを使っていきたいと思った.
参照
https://github.com/radioconda/radioconda-installer
This repository holds cross-platform installers for a collection of open source software radio packages bundled with the conda package manager, including
- Digital RF
- GNU Radio (including an increasing list of out-of-tree modules)
- gqrx
- inspectrum
and support for the following SDR devices and device libraries:
| Device | Library |
|---|---|
| ADALM-PLUTO | libiio (setup) |
| Airspy R2/Mini/HF+ | airspy/airspyhf (setup) |
| BladeRF | bladeRF (setup) |
| Ettus USRPs | UHD (setup) |
| Funcube Dongle Pro/Pro+ | SoapyFCDPP / gr-funcube |
| HackRF | HackRF (setup) |
| LimeSDR | Lime Suite (setup) |
| Mirics MSi001 + MSi2500 SDR devices | libmirisdr (setup) |
| Red Pitaya | SoapyRedPitaya |
| RFSpace/NetSDR/CloudSDR | SoapyNetSDR |
| RTL-SDR | rtl-sdr (setup) |
| Sound Card / Audio devices | SoapyAudio |
The complete list of packages can be found here. You can suggest additional software to include by filing an issue. If you've built additional software from source on top of radioconda, document your results in an issue to help others (and help me in packaging it!).
Once installed, you will have a fully functional conda distribution/environment, meaning that you can use the conda or mamba commands to install additional packages (if available through conda-forge) or upgrade to the latest versions. Think of radioconda as an alternative to Anaconda or Miniforge, but specialized for software radio.
NOTE: Radioconda is built from packages maintained by the conda-forge project. If you have questions or issues that are specific to the conda installation of a particular package, please report them at the corresponding feedstock repository.
Radioconda installers are available here: https://github.com/radioconda/radioconda-installer/releases.
| OS | Architecture | Installer Type | Download |
|---|---|---|---|
| Linux | x86_64 (amd64) | Command-line | radioconda-Linux-x86_64.sh |
| Linux | aarch64 (arm64) | Command-line | radioconda-Linux-aarch64.sh |
| Linux | ppc64le (POWER8/9) | Command-line | radioconda-Linux-ppc64le.sh |
| macOS | x86_64 (Intel) | Command-line | radioconda-MacOSX-x86_64.sh |
| macOS | x86_64 (Intel) | Graphical | radioconda-MacOSX-x86_64.pkg |
| macOS | arm64 (Apple Silicon) | Command-line | radioconda-MacOSX-arm64.sh |
| macOS | arm64 (Apple Silicon) | Graphical | radioconda-MacOSX-arm64.pkg |
| Windows | x86_64 (amd64) | Graphical | radioconda-Windows-x86_64.exe |
For a command line install, download the installer and run:
bash radioconda-*-Linux-x86_64.sh # or similar for other installers for unix platforms
For a graphical install, download the installer and double-click it.
If you already have conda/mamba, you can skip the installer and create a new environment with all of the radioconda packages by running:
conda create -n radioconda -c conda-forge -c ryanvolz --only-deps radioconda
See below for additional installation steps for particular software radio devices.
For non-interactive usage, look at the options by running the following:
bash radioconda-*-Linux-x86_64.sh -h # or similar for other installers for unix platforms
or if you are on Windows, run:
start /wait "" build/radioconda-<VERSION>-Windows-x86_64.exe /InstallationType=JustMe /RegisterPython=0 /S /D=%UserProfile%\radioconda
You will mostly use radioconda through the command line, although on Windows some applications will install shortcuts to the Start menu.
Launch "radioconda Prompt" from the Start menu (you can find it under the "radioconda" directory). From this command line, you can run mamba to install/upgrade packages or run any of the applications installed with radioconda. Some applications can also be launched through shortcuts added to the Start menu.
Launch your favorite terminal. Depending on the options you chose while installing, you may or may not already have the radioconda "base" environment activated automatically (you will see "(base)" on your command line prompt). To otherwise activate the radioconda "base" environment, run:
conda activate base
If this fails because the conda command is not found, you can activate the environment manually by running
sh <PATH_TO_RADIOCONDA>/bin/activate
From an activated environment, you will be able to run mamba to install/upgrade packages or run any of the applications installed with radioconda.
To install a particular package:
mamba install <pkg-name>
Once you have radioconda installed, you can stay up to date for all packages with:
mamba upgrade --all
To install the latest release in particular, run
(on Windows):
mamba install --file https://github.com/radioconda/radioconda-installer/releases/latest/download/radioconda-win-64.lock
(on Linux/macOS):
mamba install --file https://github.com/radioconda/radioconda-installer/releases/latest/download/radioconda-$(conda info | sed -n -e 's/^.*platform : //p').lock
To install a particular release version, substitute the desired version number and run
(on Windows):
mamba install --file https://github.com/radioconda/radioconda-installer/releases/download/20NN.NN.NN/radioconda-win-64.lock
(on Linux/macOS):
mamba install --file https://github.com/radioconda/radioconda-installer/releases/download/20NN.NN.NN/radioconda-$(conda info | sed -n -e 's/^.*platform : //p').lock
If you're starting with a fresh environment or are comfortable dealing with package conflicts, you can install the latest release using the radioconda metapackage from the ryanvolz channel:
mamba install -c conda-forge -c ryanvolz --only-deps radioconda
(It is necessary to specify the conda-forge channel first, even if it is your default channel, so that the ryanvolz channel does not take priority.)
To install a particular release version, substitute the desired version number and run
mamba install -c conda-forge -c ryanvolz --only-deps radioconda=20NN.NN.NN
To use particular software radio devices, it might be necessary to install additional drivers or firmware. Find your device below and follow the instructions. (Help add to this section by filing an issue if the instructions don't work or you have additional instructions to add!)
Install the WinUSB driver with Zadig, selecting the device that is called "Bulk-In, Interface (Interface 0)".
Blacklist the DVB-T modules that would otherwise claim the device:
sudo ln -s $CONDA_PREFIX/etc/modprobe.d/rtl-sdr-blacklist.conf /etc/modprobe.d/radioconda-rtl-sdr-blacklist.conf
sudo modprobe -r $(cat $CONDA_PREFIX/etc/modprobe.d/rtl-sdr-blacklist.conf | sed -n -e 's/^blacklist //p')
Install a udev rule by creating a link into your radioconda installation:
sudo ln -s $CONDA_PREFIX/lib/udev/rules.d/rtl-sdr.rules /etc/udev/rules.d/radioconda-rtl-sdr.rules
sudo udevadm control --reload
sudo udevadm trigger
Install the latest USB drivers by download and installing this file.
Install a udev rule by creating a link into your radioconda installation:
sudo ln -s $CONDA_PREFIX/lib/udev/rules.d/90-libiio.rules /etc/udev/rules.d/90-radioconda-libiio.rules
sudo udevadm control --reload
sudo udevadm trigger
Once you can talk to the hardware (by following the instructions below), you may want to perform the post-install steps detailed on the Pluto users wiki.
The WinUSB driver for your device will most likely be installed automatically, and in that case there is no additional setup. If for some reason the driver is not installed and the device is not recognized, install the WinUSB driver with Zadig, selecting your Airspy device.
Install a udev rule by creating a link into your radioconda installation:
# run the next line only for the Airspy R2 or Mini
sudo ln -s $CONDA_PREFIX/lib/udev/rules.d/52-airspy.rules /etc/udev/rules.d/52-radioconda-airspy.rules
# run the next line only for the Airspy HF+
sudo ln -s $CONDA_PREFIX/lib/udev/rules.d/52-airspyhf.rules /etc/udev/rules.d/52-radioconda-airspyhf.rules
sudo udevadm control --reload
sudo udevadm trigger
Then, make sure your user account belongs to the plugdev group in order to be able to access your device:
sudo usermod -a -G plugdev <user>
You may have to restart for this change to take effect.
Install the WinUSB driver with Zadig, selecting your HackRF device.
Install a udev rule by creating a link into your radioconda installation:
sudo ln -s $CONDA_PREFIX/lib/udev/rules.d/53-hackrf.rules /etc/udev/rules.d/53-radioconda-hackrf.rules
sudo udevadm control --reload
sudo udevadm trigger
Then, make sure your user account belongs to the plugdev group in order to be able to access your device:
sudo usermod -a -G plugdev <user>
You may have to restart for this change to take effect.
Install the WinUSB driver with Zadig, selecting your BladeRF device.
Install a udev rule by creating a link into your radioconda installation:
sudo ln -s $CONDA_PREFIX/lib/udev/rules.d/88-nuand-bladerf1.rules /etc/udev/rules.d/88-radioconda-nuand-bladerf1.rules
sudo ln -s $CONDA_PREFIX/lib/udev/rules.d/88-nuand-bladerf2.rules /etc/udev/rules.d/88-radioconda-nuand-bladerf2.rules
sudo ln -s $CONDA_PREFIX/lib/udev/rules.d/88-nuand-bootloader.rules /etc/udev/rules.d/88-radioconda-nuand-bootloader.rules
sudo udevadm control --reload
sudo udevadm trigger
Then, make sure your user account belongs to the plugdev group in order to be able to access your device:
sudo usermod -a -G plugdev <user>
You may have to restart for this change to take effect.
The conda-forge package uses libusb to communicate over USB with your LimeSDR device, instead of the standard CyUSB library which is not open source. If you have used your LimeSDR with another software package, you will have to switch USB drivers to one compatible with WinUSB/libusb.
Install the WinUSB driver with Zadig, selecting your Lime device.
Install a udev rule by creating a link into your radioconda installation:
sudo ln -s $CONDA_PREFIX/lib/udev/rules.d/64-limesuite.rules /etc/udev/rules.d/64-radioconda-limesuite.rules
sudo udevadm control --reload
sudo udevadm trigger
Download the firmware files by activating your conda prompt and running
uhd_images_downloader
You probably have to install a USB driver for the device. Follow the instructions from the Ettus site, or install the WinUSB driver with Zadig (your device will have a USB ID that starts with 2500 or 3923).
Install a udev rule by creating a link into your radioconda installation:
sudo ln -s $CONDA_PREFIX/lib/uhd/utils/uhd-usrp.rules /etc/udev/rules.d/radioconda-uhd-usrp.rules
sudo udevadm control --reload
sudo udevadm trigger
Install the WinUSB driver with Zadig, selecting your MiriSDR device.
Install a udev rule by creating a link into your radioconda installation:
sudo ln -s $CONDA_PREFIX/lib/udev/rules.d/mirisdr.rules /etc/udev/rules.d/radioconda-mirisdr.rules
sudo udevadm control --reload
sudo udevadm trigger
Many USB devices use libusb and need a WinUSB driver installed on Windows. Follow this procedure to install the driver for your device:
Download and run Zadig
Select your device
- It may be auto-selected since it is missing a driver
- It may not have a sensible name, but you can verify the USB ID
Ensure the target driver (middle of the interface) reads "WinUSB"
Click "Install Driver" or "Replace Driver"
![]()
Each installer package is built from a specification directory in installer_specs using conda constructor. An installer can be built manually using the build_installer.py script. The specification directories set the exact versions of the included packages so that constructor will produce a predictable result that can be tracked by git for each release. In turn, the specification directories are created/updated by re-rendering the radioconda environment specification file using the rerender.py script.
So, the procedure to create a new installer package is:
- Update the environment specification file
radioconda.yaml, if desired. - Re-render the constructor specification directories by running
rerender.py. - Commit the changes to produced by steps 1 and 2 to the git repository.
- Build the installer package for a particular platform by running
build_installer.py.
To release a new version of radioconda and build installer packages using GitHub's CI:
- Update the repository following steps 1-3 above.
- Make a new pre-release on GitHub with a name equal to the version.
- Wait until all artifacts are uploaded by CI
- Mark the pre-release as a release
NOTE: using a pre-release is important to make sure the "latest" links work.
https://qiita.com/aochan50034/items/effbc1aca64cd3bfceda 参照
Anaconda3をインストールする
1.公式サイトからインストーラのダウンロード
公式サイト (https://www.anaconda.com/download/success) に行って、Linux用のインストーラをダウンロードします。この記事を書いている、2024.6.14時点では「Python 3.11 64-Bit (x86) Installer(997.2M)」がそれにあたります。
2.bashを用いてインストーラを実行
先程ダウンロードしたインストーラをターミナル上で実行します。以下はインストーラがDownloadフォルダ直下にあるという想定ですので、適宜パスは書き換えてください。またインストーラの名称も変わっている可能性があるので、その際はインストーラ名を自分がダウンロードしたものと一致させてください。
$bash /mnt/c/Users/(user_name)/Downloads/Anaconda3-2024.02-1-Linux-x86_64.sh
しばらく待つとインストールが開始され、その後利用規約の同意を経て終了となります。
condaを使えるようにする
他の方の記事を見ているとインストールが終わった時点でcondaが使えるようになっている方もいらっしゃるようですが、私の環境では上記の作業を終えた時点では、
$conda --version
conda: command not found
というように、condaがコマンドとして認識されていませんでした。
これを解消するために、パスを通します。やり方は以下のコマンドをターミナル上で実行するだけです。
$export PATH="~/anaconda3/bin:$PATH"
これでcondaが使えるようになりましたが、その後に
$conda init
を実行することで、base環境をactivateすることができるようになります。
以上でcondaをWSL上で使えるようになりました。ここまで読んでいただいてありがとうございました。
0 件のコメント:
コメントを投稿